django入门进阶01学习笔记01
学习笔记,第一个Django应用
Part 1:请求与响应
django-admin startproject mysite
一个新建立的项目结构大概如下:
mysite/
    manage.py
    mysite/
        __init__.py
        settings.py
        urls.py
        asgi.py
        wsgi.py
python manage.py startapp polls
系统会自动生成 polls应用的目录,其结构如下:
polls/
    __init__.py
    admin.py
    apps.py
    migrations/
        __init__.py
    models.py
    tests.py
    views.py
polls/views.py文件中,编写代码:
from django.http import HttpResponse

def index(request):
    return HttpResponse("这里是liujiangblog.com的投票站点")
urls.py(不要换成别的名字),在其中输入代码如下:
from django.urls import path

from . import views

urlpatterns = [
    path('', views.index, name='index'),
]
此时,目录的文件结构是这样的:
polls/
    __init__.py
    admin.py
    apps.py
    migrations/
        __init__.py
    models.py
    tests.py
    urls.py
    views.py
mysite/urls.py文件,代码如下:
from django.contrib import admin
from django.urls import include, path

urlpatterns = [
    path('polls/', include('polls.urls')),
    path('admin/', admin.site.urls),
]
Part 2:模型与后台
polls/models.py
from django.db import models


class Question(models.Model):
    question_text = models.CharField(max_length=200)
    pub_date = models.DateTimeField('date published')


class Choice(models.Model):
    question = models.ForeignKey(Question, on_delete=models.CASCADE)
    choice_text = models.CharField(max_length=200)
    votes = models.IntegerField(default=0)
INSTALLED_APPS中,将该路径添加进去(字符串格式)
python manage.py makemigrations polls
python manage.py sqlmigrate polls 0001#展示SQL语句
python manage.py check#检查项目中的错误,并不实际进行迁移或者链接数据库的操作。
python manage.py migrate#运行migrate命令,在数据库中进行真正的表操作了。
进入Python的shell,请输入命令:
python manage.py shell
相比较直接输入“python”命令的方式进入Python环境,调用manage.py参数能将DJANGO_SETTINGS_MODULE环境变量导入,它将自动按照mysite/settings.py中的设置,配置好你的python shell环境,这样,你就可以导入和调用任何你项目内的模块了。
或者你也可以这样,先进入一个纯净的python环境,然后启动Django,具体如下:
>>> import django
>>> django.setup()
尝试下面的API吧
>>> from polls.models import Question, Choice # 导入我们写的模型类

# 现在系统内还没有questions对象
>>> Question.objects.all()
Part 3:视图和模板
get_object_or_404()方法将一个Django模型作为第一个位置参数,后面可以跟上任意数量的关键字参数,如果对象不存在则弹出Http404错误。
get_list_or_404()方法,和上面的get_object_or_404()类似,只不过是用来替代filter()函数
删除模板中硬编码的URLs
<li><a href="{% url 'detail' question.id %}">{{ question.question_text }}</a></li>
Django会在polls.urls文件中查找name=’detail’的路由,具体的就是下面这行:
path('<int:question_id>/', views.detail, name='detail'),
让我们将代码修改得更严谨一点,将polls/templates/polls/index.html中的
<li><a href="{% url 'detail' question.id %}">{{ question.question_text }}</a></li>
修改为:
<li><a href="{% url 'polls:detail' question.id %}">{{ question.question_text }}</a></li>
注意引用方法是冒号,不是圆点也不是斜杠!
Part 4:表单和类视图(略)
Part 5:测试
polls/tests.py文件中:
import datetime
from django.utils import timezone
from django.test import TestCase
from .models import Question

class QuestionMethodTests(TestCase):
    def test_was_published_recently_with_future_question(self):
        """
        在将来发布的问卷应该返回False
        """
        time = timezone.now() + datetime.timedelta(days=30)
        future_question = Question(pub_date=time)
        self.assertIs(future_question.was_published_recently(), False)
python manage.py test polls
其中都发生了些什么?:
python manage.py test polls命令会查找投票应用中所有的测试程序
发现一个django.test.TestCase的子类
为测试创建一个专用的数据库
查找名字以test开头的测试方法
在test_was_published_recently_with_future_question方法中,创建一个Question实例,该实例的pub_data字段的值是30天后的未来日期。
然后利用assertIs()方法,它发现was_published_recently()返回了True,而不是我们希望的False。
最后,测试程序会通知我们哪个测试失败了,错误出现在哪一行。
Part 6:静态文件
每个templates包含一个与应用同名的子目录,每个static也包含一个与应用同名的子目录。
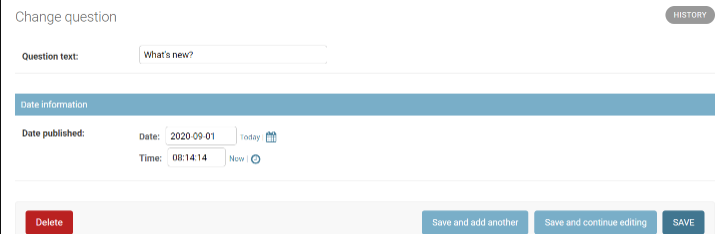
Part 7:自定义admin
当表单含有大量字段的时候,你更多的是想将表单划分为一些字段的集合。
再次修改polls/admin.py:
from django.contrib import admin

from .models import Question


class QuestionAdmin(admin.ModelAdmin):
    fieldsets = [
        (None,               {'fields': ['question_text']}),
        ('Date information', {'fields': ['pub_date']}),
    ]

admin.site.register(Question, QuestionAdmin)